应用截图
详细介绍
Chrome Based Digital Signage Player for PiSignage, a Digital Signage Solution for Small Enterprises.
PiSignage is a cloud-based Digital Signage Solution for Small Enterprises. The Signage Player is based on Raspberry Pi, an off-the-shelf credit-card sized Computer. The Cloud server comes with a simple Admin Panel, enabling you to deploy the solution in minutes.
PiSignage on Chrome provides the same Signage Player features in a Chrome Extension. By installing the extension, you can experience the player functions in your PC/device and without the need for a Raspberry Pi.
*** GETTING STARTED ***
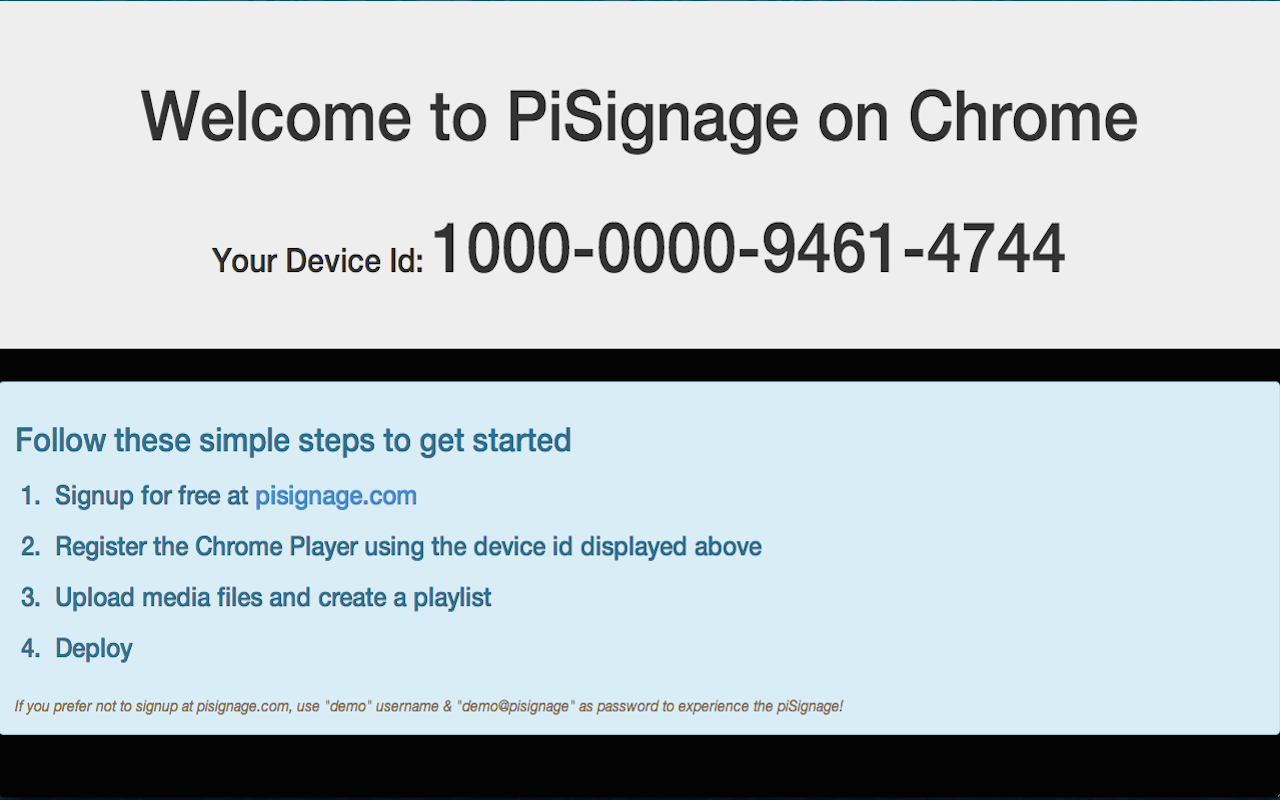
1. Sign-up for free at www.pisignage.com
2. Add the extension "PiSignage on Chrome" to your browser from Chrome Web Store.
3. Click on the Chrome Extension to start the player
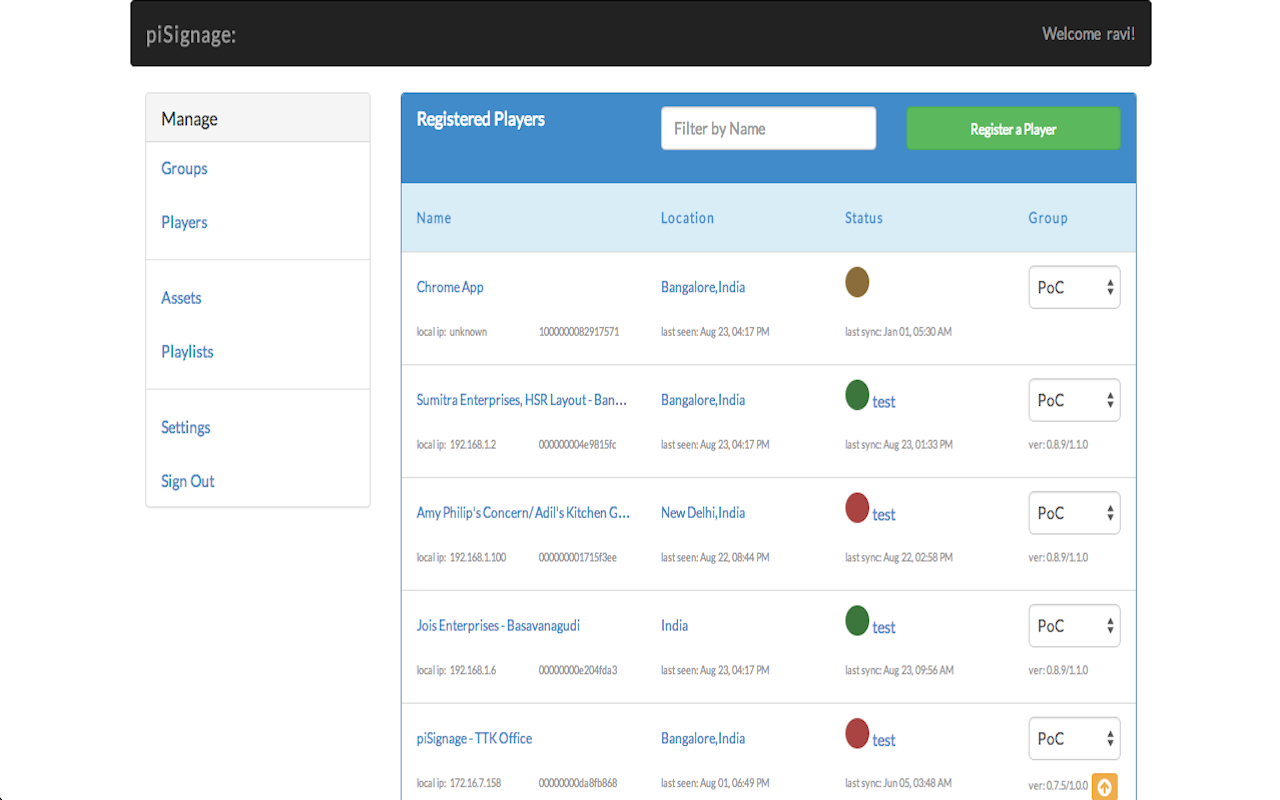
4. Register the player using the Device ID displayed on the screen at pisignage.com
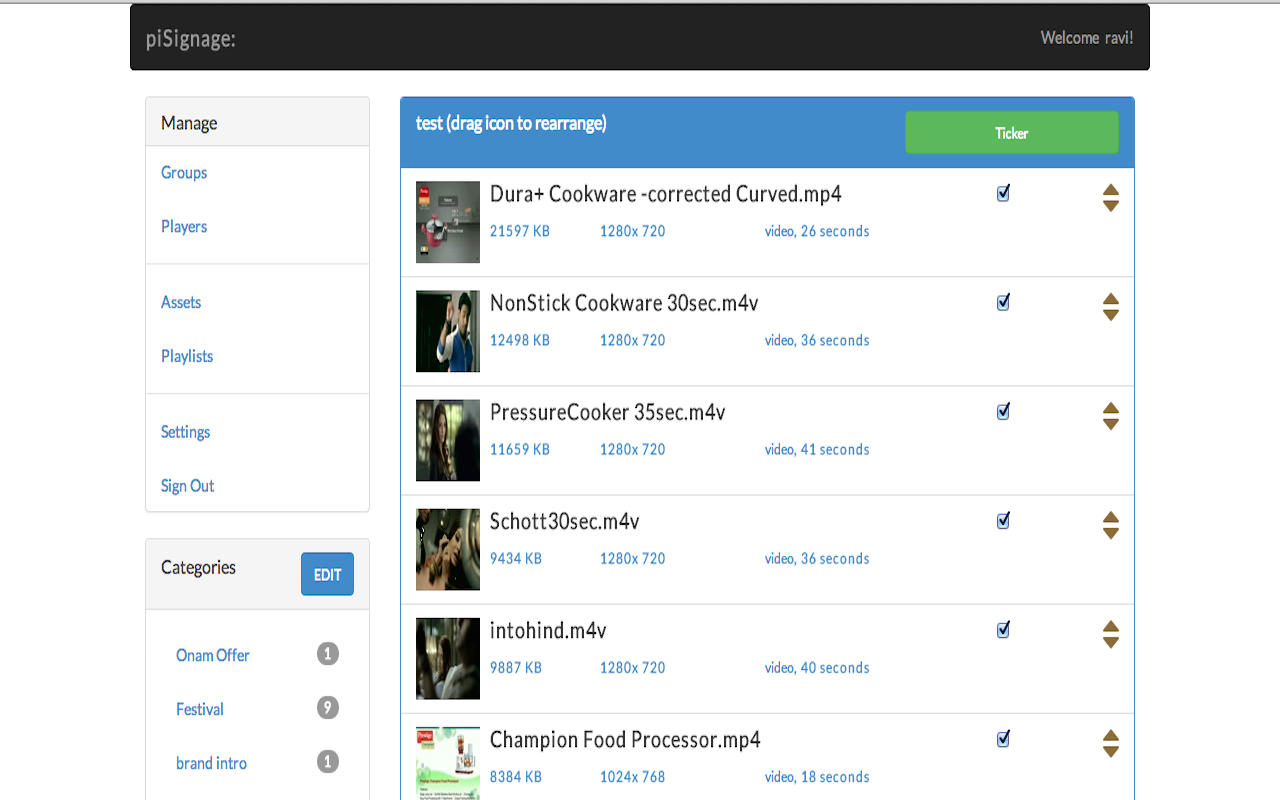
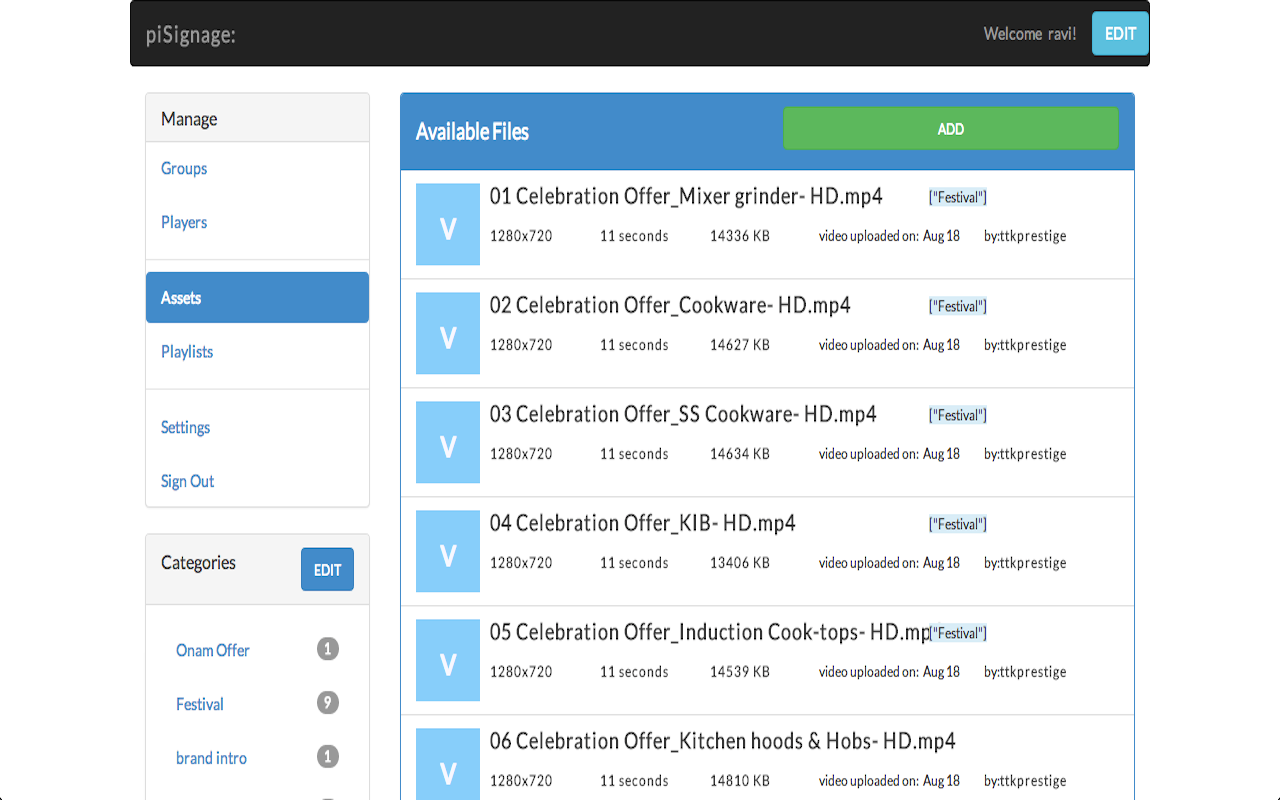
4. Upload media files and create a playlist.
5. Deploy to the registered device (you can create groups of players if needed and deploy selectively)
- > For any queries, email us at support@pisignage.com
- > Learn more about PiSignage at https://help.pisignage.com/hc/en-us.
- > Check out our Youtube Channel for demo and use cases: https://www.youtube.com/c/PiSignage
- > Follow us on Twitter for more updates: https://twitter.com/pisignage
*** PiSignage for Google Chrome in Fullscreen for Windows ***
1. Install the Extension in your Chrome Browser
2. Setup Chrome in Kiosk Mode. (Fullscreen Mode)
- Document for Reference: https://facilitynet.zendesk.com/hc/da/articles360052966691-How-to-setup-Chrome-Kiosk-Mode-in-Windows-10
- Add a Shortcut of Chrome to your Desktop (ignore if a shortcut already exists).
- Right Click on the shortcut and Click on Properties.
- Navigate to "Shortcut" tab then add '--kiosk' at the end of ‘Target‘ field, then click on 'Apply' and 'OK'.
3. Enable Chrome to run automatically on Boot
- Document for Reference: https://shorturl.at/bkqRZ
- Open 'Run Command' window by pressing [Windows+R] and type 'shell:startup' to open the Startup Folder.
- Paste the Chrome Shortcut whose Target field was modified earlier.
- Restart the System to see PiSignage for Chrome running in Fullscreen after logging into your system.
4. Steps for Stopping the Chrome Kiosk player
- Press [Windows + D] to go to Desktop when the Player is playing your desired content.
- Right Click on Chrome in the TaskBar (bar at the bottom) and Click 'Close Window'.
- If you need to restart the player once it has been terminated, Double click on the Chrome Shortcut on your Desktop.
*** Version History ***
v2.9.0 Oct 11,2022
------------------
1. Transition from Chrome Web App to Player based on Chrome Extension.
v2.8.0 Dec 30,2017
------------------
1. Brought the Chrome Player on par with v1.9.7 of piSignage Pi player (https://github.com/colloqi/piSignage/blob/master/RELEASE%20NOTES.md)
2. Emergency message feature under Group
3. Clock position either on top or bottom of screen, 12 or 24 hour format under Group settings
4. Radio link support for streaming audio
5. Avoid blank screen while playing single video in case of single video playlist
6. Validity of assets check in main playlist
7. Enable asset played log
8. Scheduling does not work in case of no Internet - fixed
9. Video mute option
10. Audio options for all zones and music playlists support
11. Ticker speed control
12. Independent playlist support for non-main zones
13. Increase maximum RSS items to 100 (from 10) and support description field as well from RSS feed to show
v2.7.2 Aug 3,2017
------------------
1. Support for more media RSS sites
2. App inline with Progressive Web App for piSignage
v2.7.1 Apr 24,2017
------------------
1. Fixed - Youtube with url reload option, autoplay was not happening in some cases
v2.7.0 Apr 17,2017
------------------
1. Brought the Chrome Player on par with v1.8.9 of piSignage Pi player (https://github.com/colloqi/piSignage/blob/master/RELEASE%20NOTES.md)
2. Fixed issues like multiple download happening at the same time and other minor fixes
3. Features which are not available in Chrome Player as compared to Raspberry Pi Player
- Player Snapshot
- Player shell
- Customization of welcome screen
- Boot Video
- In case of HTML repo (.zip) upload, third party script executions are not allowed (please use weblink option
after hosting the repo in a server)
- RTSP streaming support
- Animation support (fade animation is enabled)
- CEC and TV ON/OFF support
- Resolution is based on the PC settings
- wifi, IP configurations are not part of the player
v2.6.5 Dec 28,2016
-------------------
1. Fixed permission issue for power api in 2.6.4
v2.6.4 Dec 28,2016
-------------------
1. Prevent Chrome OS from going to sleep
v2.6.3 Oct 20,2016
-------------------
1. Solved the issue - Unable to change config server
v2.6.2 Oct 05,2016
-------------------
1. Force load link with timestamp if urlReloadDisable is not set
v2.6.1 June 30,2016
-------------------
1. Support Video in all zones, in zones other than main, video is looped till it is changed
v2.6.0 June 9,2016 (in sync with 1.6.3 of pi player)
---------------------------------------------------
1. Portrait mode support in CSS
2. Group level Ticker
3. Switch to next playlist after complete download
4. Synchronised play across players
5. Fix for same day schedule not working
6. Support weblink
7. domain based license support
8. new 2ap270 and 2bp270 support
**Changes not yet supported in Chrome Player**
1. Logo display
2. Snapshot support
3. Custom Layouts
v2.5.0 Feb 1,2016 (in sync with 1.4.1 of pi player)
---------------------------------------------------
1. fullscreen support for individual assets and for adverts in multi-zone playlists
2. Added server and connection status to welcome screen & change status displayed
3. variable __connectionstatus__ added for ticker
4. Do not restart background music if already playing
5. License feature has been incorporated to Chrome Player
6. Scheduling playlist start-date and end-date errors when the timezone is less than GMT
v2.4.0 Nov 30,2015 (in sync with 1.3.0 of pi player)
---------------------------------------------------
1. Duplicate and add the same asset multiple times to a playlist
2. Ability to change the background color of Signage Player under Group Display Settings
3. Introduction of new layouts 2c,2d
4. Introduction of __cpuid__ and __myipaddress__ variables in Ticker messages to display CPU ID and IP address
5. Stats for files played changed to make it more scalable
6. Option for not reloading link under Group Display Settings
v2.3.2 Oct 26, 2015
----------------------
1. Added settings page to change server, cpuid and switch to secondary screen
2. Mouse Click or any key press will display settings icon for 5 seconds on screen, press the icon to goto settings page
3. Change the CPU id to maintain old license in case of app re-installation
4. Change the default server (pisignage.com) link to point to local server
5. In case of multiple displays, switch the display
v2.2.6 Oct 6, 2015
----------------------
1. Fixed memory leak issues
v2.2.4 Oct 1, 2015
----------------------
1. Fixed issues with html repo fix
v2.2.3 Oct 1, 2015
----------------------
1. Deploying issues when player is offline during deploy
2. Video timeout issue
v2.2.2 Sep 30, 2015
----------------------
1. Fixed the issue - Videos not autoplaying if there is only one video
v2.2.1 Sep 24, 2015
----------------------
1. Reliability enhancements for video play
2. Changed Playlist not syncing
v2.1.7 Sep 22, 2015
----------------------
1.12 Hour format for Gcal Calendar (using toLocaleTimeString)
v2.1.6 Sep 22, 2015
----------------------
1. Fixed Scheduling issues
v2.1.4 Sep 21, 2015
----------------------
1. Added Google Calendar Support
v2.1.3 Sep 19,2015
----------------------
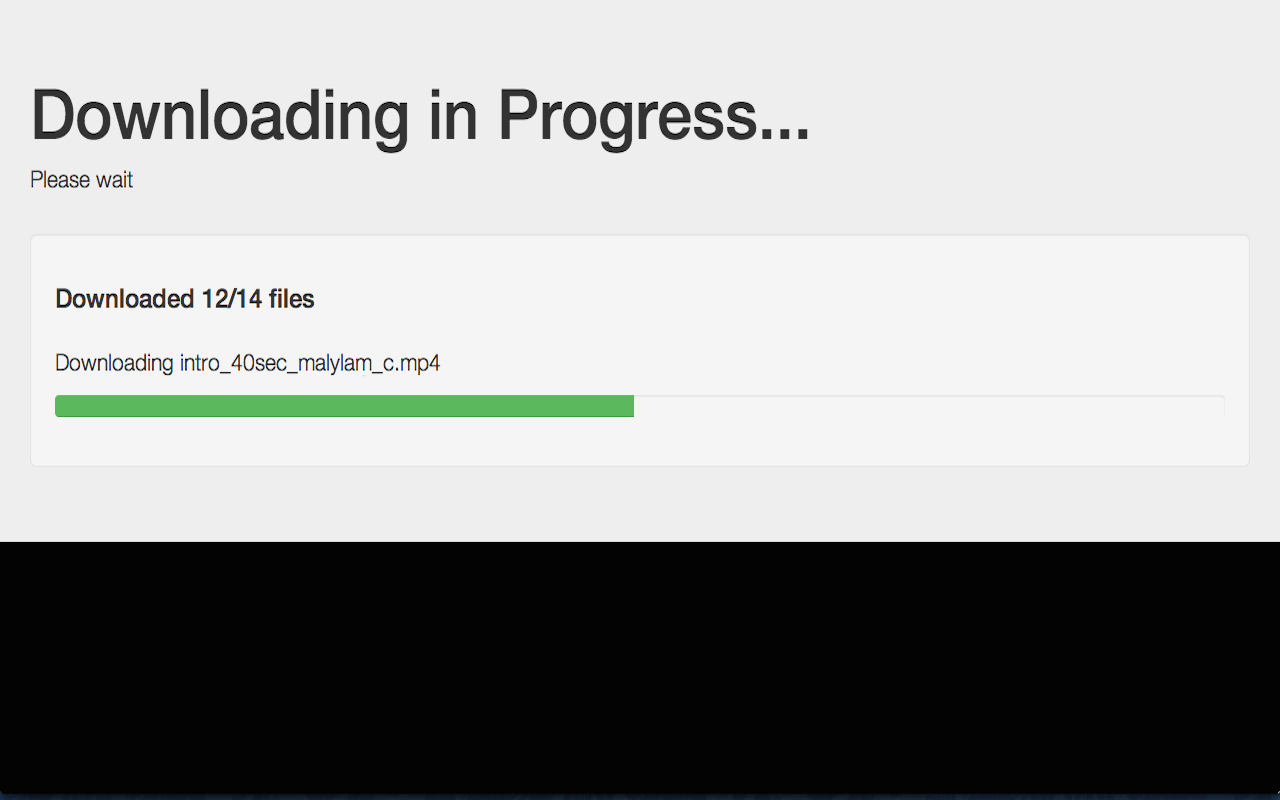
1. Fixed issues with downloading of file (length check), ticker for download progress indicator and group changes
v2.1.0 release note(Sep 17,2015)
-------------------------------------
1. Added RSS Ticker support
2. HTML repository as zip file upload support
v2.0.4 release note(Sep 13,2015)
-------------------------------------
1. fixed layout 2a and last upload update issue
v2.0.2 release note(Sep 13,2015)
-------------------------------------
1. Screen going black if not able to select playlist
2. device ID text selection using mouse
3. prod.html not included error
v2.0.0 release note(Sep 13,2015)
-------------------------------------
1. Rewrote the app based on piSignage Player to make it full pledged player compatible with Pi Player
2. Compatible with Raspberry piSignage player except for the following (coming soon)
- Support for Android/Chrome Remote
- Ticker RSS feed support
- HTML zip file support for playing
v1.0.3/1.0.2 release note(Nov 14,2014)
--------------------------------------
1. added Google Calendar support for Chrome Player
2. group change issues fixed (1.0.3)
v1.0.1 release note(Nov 2,2014)
------------------------------------
1. fixed "not loading playlist first time after installation"
2. added audio support (audio file keeps playing in the background for images/notices), upload a mp3 file and add to the playlist before images.
v1.0.0 new features(Nov 1, 2014)
--------------------------------------
1. health and event logging support
2. multiple playlist and scheduling of playlist
3. html notice support
4. version number in sync with Pi, version & platform reporting
5. bug fixes
PiSignage is a cloud-based Digital Signage Solution for Small Enterprises. The Signage Player is based on Raspberry Pi, an off-the-shelf credit-card sized Computer. The Cloud server comes with a simple Admin Panel, enabling you to deploy the solution in minutes.
PiSignage on Chrome provides the same Signage Player features in a Chrome Extension. By installing the extension, you can experience the player functions in your PC/device and without the need for a Raspberry Pi.
*** GETTING STARTED ***
1. Sign-up for free at www.pisignage.com
2. Add the extension "PiSignage on Chrome" to your browser from Chrome Web Store.
3. Click on the Chrome Extension to start the player
4. Register the player using the Device ID displayed on the screen at pisignage.com
4. Upload media files and create a playlist.
5. Deploy to the registered device (you can create groups of players if needed and deploy selectively)
- > For any queries, email us at support@pisignage.com
- > Learn more about PiSignage at https://help.pisignage.com/hc/en-us.
- > Check out our Youtube Channel for demo and use cases: https://www.youtube.com/c/PiSignage
- > Follow us on Twitter for more updates: https://twitter.com/pisignage
*** PiSignage for Google Chrome in Fullscreen for Windows ***
1. Install the Extension in your Chrome Browser
2. Setup Chrome in Kiosk Mode. (Fullscreen Mode)
- Document for Reference: https://facilitynet.zendesk.com/hc/da/articles360052966691-How-to-setup-Chrome-Kiosk-Mode-in-Windows-10
- Add a Shortcut of Chrome to your Desktop (ignore if a shortcut already exists).
- Right Click on the shortcut and Click on Properties.
- Navigate to "Shortcut" tab then add '--kiosk' at the end of ‘Target‘ field, then click on 'Apply' and 'OK'.
3. Enable Chrome to run automatically on Boot
- Document for Reference: https://shorturl.at/bkqRZ
- Open 'Run Command' window by pressing [Windows+R] and type 'shell:startup' to open the Startup Folder.
- Paste the Chrome Shortcut whose Target field was modified earlier.
- Restart the System to see PiSignage for Chrome running in Fullscreen after logging into your system.
4. Steps for Stopping the Chrome Kiosk player
- Press [Windows + D] to go to Desktop when the Player is playing your desired content.
- Right Click on Chrome in the TaskBar (bar at the bottom) and Click 'Close Window'.
- If you need to restart the player once it has been terminated, Double click on the Chrome Shortcut on your Desktop.
*** Version History ***
v2.9.0 Oct 11,2022
------------------
1. Transition from Chrome Web App to Player based on Chrome Extension.
v2.8.0 Dec 30,2017
------------------
1. Brought the Chrome Player on par with v1.9.7 of piSignage Pi player (https://github.com/colloqi/piSignage/blob/master/RELEASE%20NOTES.md)
2. Emergency message feature under Group
3. Clock position either on top or bottom of screen, 12 or 24 hour format under Group settings
4. Radio link support for streaming audio
5. Avoid blank screen while playing single video in case of single video playlist
6. Validity of assets check in main playlist
7. Enable asset played log
8. Scheduling does not work in case of no Internet - fixed
9. Video mute option
10. Audio options for all zones and music playlists support
11. Ticker speed control
12. Independent playlist support for non-main zones
13. Increase maximum RSS items to 100 (from 10) and support description field as well from RSS feed to show
v2.7.2 Aug 3,2017
------------------
1. Support for more media RSS sites
2. App inline with Progressive Web App for piSignage
v2.7.1 Apr 24,2017
------------------
1. Fixed - Youtube with url reload option, autoplay was not happening in some cases
v2.7.0 Apr 17,2017
------------------
1. Brought the Chrome Player on par with v1.8.9 of piSignage Pi player (https://github.com/colloqi/piSignage/blob/master/RELEASE%20NOTES.md)
2. Fixed issues like multiple download happening at the same time and other minor fixes
3. Features which are not available in Chrome Player as compared to Raspberry Pi Player
- Player Snapshot
- Player shell
- Customization of welcome screen
- Boot Video
- In case of HTML repo (.zip) upload, third party script executions are not allowed (please use weblink option
after hosting the repo in a server)
- RTSP streaming support
- Animation support (fade animation is enabled)
- CEC and TV ON/OFF support
- Resolution is based on the PC settings
- wifi, IP configurations are not part of the player
v2.6.5 Dec 28,2016
-------------------
1. Fixed permission issue for power api in 2.6.4
v2.6.4 Dec 28,2016
-------------------
1. Prevent Chrome OS from going to sleep
v2.6.3 Oct 20,2016
-------------------
1. Solved the issue - Unable to change config server
v2.6.2 Oct 05,2016
-------------------
1. Force load link with timestamp if urlReloadDisable is not set
v2.6.1 June 30,2016
-------------------
1. Support Video in all zones, in zones other than main, video is looped till it is changed
v2.6.0 June 9,2016 (in sync with 1.6.3 of pi player)
---------------------------------------------------
1. Portrait mode support in CSS
2. Group level Ticker
3. Switch to next playlist after complete download
4. Synchronised play across players
5. Fix for same day schedule not working
6. Support weblink
7. domain based license support
8. new 2ap270 and 2bp270 support
**Changes not yet supported in Chrome Player**
1. Logo display
2. Snapshot support
3. Custom Layouts
v2.5.0 Feb 1,2016 (in sync with 1.4.1 of pi player)
---------------------------------------------------
1. fullscreen support for individual assets and for adverts in multi-zone playlists
2. Added server and connection status to welcome screen & change status displayed
3. variable __connectionstatus__ added for ticker
4. Do not restart background music if already playing
5. License feature has been incorporated to Chrome Player
6. Scheduling playlist start-date and end-date errors when the timezone is less than GMT
v2.4.0 Nov 30,2015 (in sync with 1.3.0 of pi player)
---------------------------------------------------
1. Duplicate and add the same asset multiple times to a playlist
2. Ability to change the background color of Signage Player under Group Display Settings
3. Introduction of new layouts 2c,2d
4. Introduction of __cpuid__ and __myipaddress__ variables in Ticker messages to display CPU ID and IP address
5. Stats for files played changed to make it more scalable
6. Option for not reloading link under Group Display Settings
v2.3.2 Oct 26, 2015
----------------------
1. Added settings page to change server, cpuid and switch to secondary screen
2. Mouse Click or any key press will display settings icon for 5 seconds on screen, press the icon to goto settings page
3. Change the CPU id to maintain old license in case of app re-installation
4. Change the default server (pisignage.com) link to point to local server
5. In case of multiple displays, switch the display
v2.2.6 Oct 6, 2015
----------------------
1. Fixed memory leak issues
v2.2.4 Oct 1, 2015
----------------------
1. Fixed issues with html repo fix
v2.2.3 Oct 1, 2015
----------------------
1. Deploying issues when player is offline during deploy
2. Video timeout issue
v2.2.2 Sep 30, 2015
----------------------
1. Fixed the issue - Videos not autoplaying if there is only one video
v2.2.1 Sep 24, 2015
----------------------
1. Reliability enhancements for video play
2. Changed Playlist not syncing
v2.1.7 Sep 22, 2015
----------------------
1.12 Hour format for Gcal Calendar (using toLocaleTimeString)
v2.1.6 Sep 22, 2015
----------------------
1. Fixed Scheduling issues
v2.1.4 Sep 21, 2015
----------------------
1. Added Google Calendar Support
v2.1.3 Sep 19,2015
----------------------
1. Fixed issues with downloading of file (length check), ticker for download progress indicator and group changes
v2.1.0 release note(Sep 17,2015)
-------------------------------------
1. Added RSS Ticker support
2. HTML repository as zip file upload support
v2.0.4 release note(Sep 13,2015)
-------------------------------------
1. fixed layout 2a and last upload update issue
v2.0.2 release note(Sep 13,2015)
-------------------------------------
1. Screen going black if not able to select playlist
2. device ID text selection using mouse
3. prod.html not included error
v2.0.0 release note(Sep 13,2015)
-------------------------------------
1. Rewrote the app based on piSignage Player to make it full pledged player compatible with Pi Player
2. Compatible with Raspberry piSignage player except for the following (coming soon)
- Support for Android/Chrome Remote
- Ticker RSS feed support
- HTML zip file support for playing
v1.0.3/1.0.2 release note(Nov 14,2014)
--------------------------------------
1. added Google Calendar support for Chrome Player
2. group change issues fixed (1.0.3)
v1.0.1 release note(Nov 2,2014)
------------------------------------
1. fixed "not loading playlist first time after installation"
2. added audio support (audio file keeps playing in the background for images/notices), upload a mp3 file and add to the playlist before images.
v1.0.0 new features(Nov 1, 2014)
--------------------------------------
1. health and event logging support
2. multiple playlist and scheduling of playlist
3. html notice support
4. version number in sync with Pi, version & platform reporting
5. bug fixes